If photography is your line of work, then Adobe Lightroom is probably familiar to you. With its strong editing skills and organizational tools that simplify the post-processing workflow, it is vital for photographers everywhere. Lightroom is the go-to program for both pros and amateurs when it comes to organizing and managing massive photo collections, modifying colors and exposure, and more.
However, the learning curve of Lightroom often comes with perceived stagnation points because you are not aware of the software’s complete potential. In this article, we will tackle the Hidden Features Of Lightroom.
Hidden Features Of Lightroom
Adobe Lightroom has its own treasures just waiting to be discovered, much like your favorite hidden gem at a thrift store. This program is similar to a creative maze, with hidden passageways that lead to strong tools that can take your ordinary photos and turn them into amazing ones.
In this post, we reveal eight tricks you can add to your repertoire to put an end to the hide-and-seek with your editing game. These features are similar to the popular kids at school: you know they’re there, but only a chosen few actually get to hang out with them.
The All-purpose Alt Key
Oh, the blessed alt/option key. Thanks to its never-ending wonders, you can modify saturation and sharpening in the quick development panel without entering the development module. For bulk editing, it’s revolutionary.
Making categorization easy is another treasure: the Library Panel’s alt/option feature lets you quickly set keywords to your photographs. Did you know you can streamline your sidebar tools and save a ton of time switching between them by using the same key to enable solo mode? Oh, we can go on.
Remember to use the alt/option to bring up the “Reset Settings” button, a significant time-saver that may be used to quickly reset a panel. In addition, the alt/option can be used to adjust the radial filters, center the crop, reverse your graduated filter, change its intensity, and even toggle the eraser when using the adjustment brush tool.
By streamlining your workflow and subtly boosting your creative process, these Lightroom tips are like having your own secret editing toolkit up your sleeve.
Custom camera defaults
Oh, the fascinating world of cameras and their unique personalities! It’s like having a large group of photo friends, each with their own special charm. Knowing the subtle differences between your pocket-sized point-and-shoot and your trusty DSLR will help you become an expert Lightroom user.
This thorough understanding of your equipment can greatly impact how you work with Lightroom. You will save time by tailoring settings according to the camera being utilized. Think of the opportunities: selling your carefully designed presets could open up a new revenue stream and enable faster editing.
Multiple deletions
It’s a common experience, let’s admit it: clicking away and discovering a digital mountain of photos. Happens! Our hard disks take the brunt of our snap-happy moments, whether it’s the thrill of capturing the ideal shot or a wildlife photography frenzy. Fortunately, a quick fix in Lightroom will allow you to eliminate many pointless pictures without breaking a sweat.
Simply tap ‘X’ to reject the images you wish to remove, and then use Command + Delete (Mac) or Ctrl + Backspace (PC) to make them disappear. You can either remove the rejects from Lightroom or erase them completely from your disk when a small pop-up window displays. And voila!
Visualise and remove spots
The Spot Removal Tool in Lightroom is an effective tool for erasing undesirable sensor dust spots from images. With a swipe of the editing wand, you may adjust contrasts and uncover flaws with its inverted view. Users can drag the tool’s autofill to the proper area if it chooses the incorrect spot.
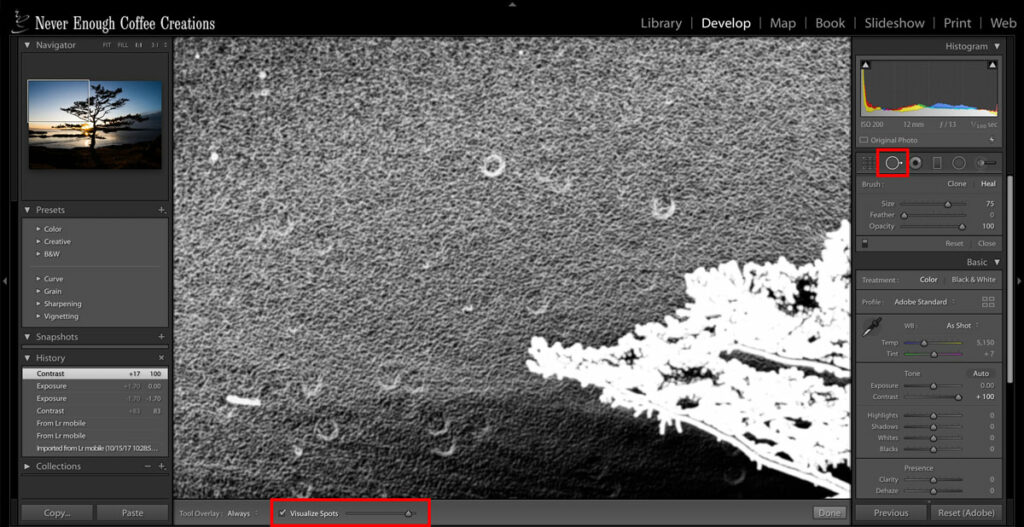
The ‘Visualize Spots’ tool functions as a personal CSI investigator to identify sensor offenders. Lightroom successfully expunges sensor spots from photo albums by synchronizing healing points throughout pictures. Master these tricks and let your pictures shine without any spots.
Decrease slider sensitivity
The sliders on Lightroom’s right side panel are small and prone to being activated quickly, so tinkering with them can seem like tiptoeing through a field of touchy buttons. Fortunately, there’s a fix for this digital dance: enlarge your panel’s left margin for more fluid modifications.
Lightroom graciously remembers this configuration once it has been enlarged, sparing you the trouble of making adjustments each time. You can skip this hassle entirely by using your keyboard’s arrow keys instead. So take a seat back, unwind, and watch those sliders effortlessly glide into perfection!
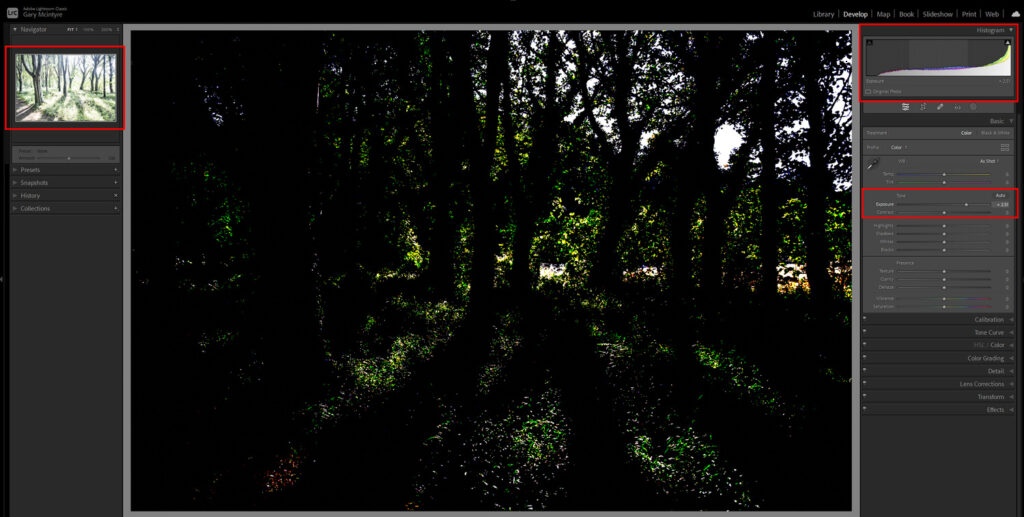
Decrease curve tool sensitivity
Although the curves panel is a powerful tool, it can occasionally feel a little confined. But worry not—here’s a great Lightroom tip for you: Once you adjust a curve, hold down the alt option key. It becomes easier to make accurate adjustments as your mouse or trackpad becomes less sensitive. Put your magic to use!
Match exposure
With a handy tool up its sleeve, Lightroom has you covered if you want to ensure that every exposure looks consistent. You may easily choose the remaining images in the batch to ensure your masterpiece remains in the limelight after perfecting it.
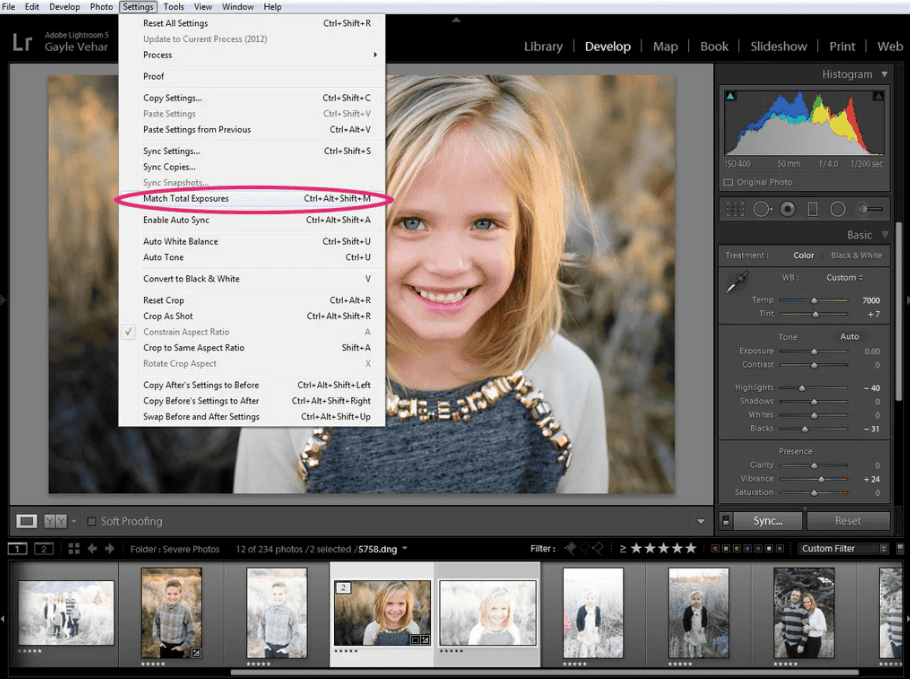
Navigate to Develop Settings -> Photo and select the enchanted Match Total Exposures option. And voilà! Lightroom will do its magic and intelligently align all of the photos you’ve chosen regarding exposure. Simple as pie, huh?
Sync adjustments
Ah, the allure of Lightroom’s Sync function is especially strong when you have a mound of photos just begging to be styled to your liking. It looks like an endless process to edit every single picture separately. Fortunately, you don’t have to worry. You can just work on the first image’s adjustments, choose the others that want the same treatment, and then, if you like, right-click to activate the Sync feature.
Once you select which settings to sync, a cute little box lets you add the finishing touches to each photograph. Keep in mind that, to preserve those priceless improvements, you must begin syncing with your altered photo.
Conclusion | Hidden Features Of Lightroom
Finding hidden treasures when navigating Lightroom can spice up your photo-editing experience. These subtleties not only make editing easier but also provide a little extra zing to your artistic pursuits. We hope you found something useful here, and learning about them can make photo editing much more pleasurable.
But we urge you to keep exploring as you learn these secrets because the field of photo editing is broad and always changing. Your drive for experimentation will refine your craft and make the process more rewarding.