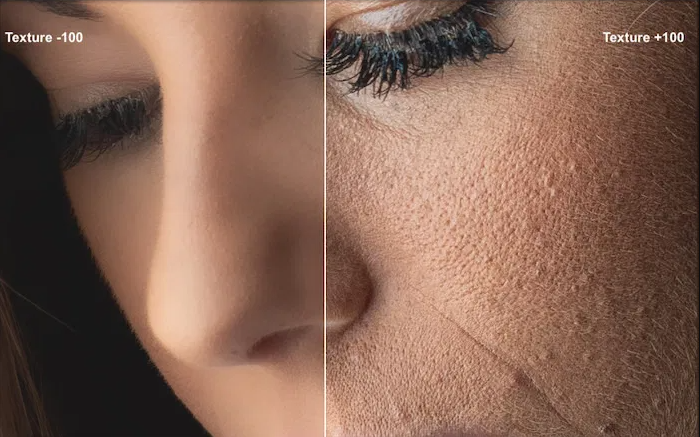
Lightroom is an exceptional tool for photographers looking to enhance their images. One of its standout features is the ability to smooth skin for portraits, helping you achieve a polished and professional look without over-editing. This How to Smooth Skin in Lightroom guide provides step-by-step instructions and effective methods.

Why Skin Smoothing is Important in Portraits
Skin smoothing is not about erasing imperfections but enhancing natural beauty while keeping textures intact. Lightroom’s features allow you to do this in a non-destructive way, ensuring your edits look realistic. Whether you’re a professional photographer or editing for personal projects, mastering this technique can elevate your portraits significantly.
How to Smooth Skin in Lightroom?
1. Import Your Image into Lightroom
- Open Lightroom and import the photo you want to edit.
- Click on the image to move into the Develop module.
2. Use the Adjustment Brush Tool
Select the Adjustment Brush from the toolbar on the right side.
In the brush settings panel, adjust the following sliders:
- Texture: Lower it to reduce fine details.
- Clarity: Reduce slightly to soften the overall look.
- Sharpness: Lower it if the skin appears too sharp or detailed.

Zoom into the area you want to smooth.
Paint over the skin areas while avoiding sharp features like eyes, lips, and eyebrows to maintain a natural look.
3. Fine-Tune the Brush Settings
- After applying the brush, evaluate the effect.
- If it looks too soft or unnatural, slightly increase the Texture or Clarity until it balances with the rest of the photo.
- Adjust the Feather and Flow settings of the brush for more control over the blending.
4. Apply Preset Skin Smoothing Effects
- Lightroom also offers built-in presets or third-party downloadable presets for skin smoothing.
- Go to the Presets panel on the left side in the Develop module.
- Look for skin smoothing presets under categories like Portrait or Beauty.
- Apply the preset and tweak its settings if necessary.
5. Use the Healing Brush for Blemishes
- Select the Healing Brush tool from the toolbar.
- Adjust the brush size to match the blemish or spot you want to remove.
- Click on the blemish, and Lightroom will automatically sample a nearby area to blend it seamlessly.
- This step is essential before or after skin smoothing to ensure the portrait looks clean.
Additional Tips for Smoother Results
- Balance is Key: Over-smoothing can make the skin look fake. Always maintain natural textures.
- Work in Small Sections: Zoom in and edit small areas at a time for precise control.
- Preserve Highlights and Shadows: Avoid smoothing areas that define the face’s structure, such as cheekbones or jawlines.
Alternate Methods to Smooth Skin in Lightroom
Using Lightroom Mobile
Lightroom Mobile offers a simplified version of the desktop tool for those editing on the go.
1. Open your photo and navigate to the Healing tool.
2. Use the Selective Adjustment feature to lower Texture and Clarity in specific areas.
3. Use the Detail slider to bring back sharpness if needed.
Lightroom AI Masks for Skin Toning
The AI Masking feature in Lightroom Classic can automatically detect skin areas.
1. Open the Masking Panel and select Subject or People.
2. Choose skin as the area to edit.
3. Lower Texture and Clarity as needed.
Final Touches and Export
- After smoothing the skin, check the entire image for consistency. Make sure the edits blend naturally with other features of the portrait.
- Apply final color grading for a cohesive look.
- Export the image in the desired format by clicking on File > Export and selecting your preferred settings.
Frequently Asked Questions
Can I smooth skin in Lightroom Mobile?
Lightroom Mobile allows you to smooth skin using Selective Adjustments and the Healing Brush. Adjust the Texture and Clarity sliders within a specific area for effects similar to those of the desktop version. While it’s slightly more limited than the desktop version, it’s effective for quick edits.

What is the difference between Texture and Clarity sliders?
The Texture slider targets finer details, softening or enhancing elements like pores and small wrinkles, making it ideal for skin smoothing. The Clarity slider affects mid-tone contrast, making the image appear softer or more defined, depending on how it’s adjusted.
Should I use Lightroom or Photoshop for skin smoothing?
Both Lightroom and Photoshop are excellent tools for skin smoothing. Lightroom is ideal for non-destructive, quick edits with easy-to-use sliders and brushes. Photoshop offers more advanced retouching options, such as frequency separation and layer-based editing, for those seeking detailed refinements.
How do I avoid over-smoothing the skin?
To avoid over-smoothing, always work in small sections and zoom out frequently to check the overall effect. Use moderate adjustments to sliders like Texture and Clarity, and preserve natural textures and features such as freckles and fine lines for a realistic result.
Can I save my settings for future edits?
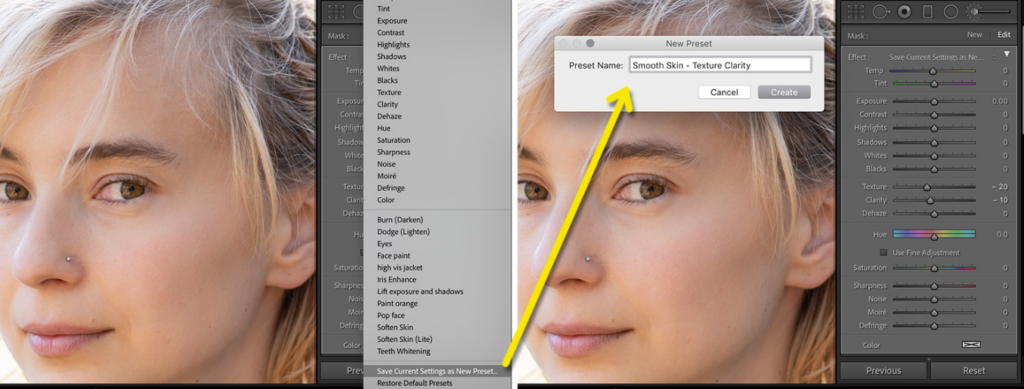
You can save your adjustments as a Preset in Lightroom. After making the skin-smoothing adjustments, click the + icon in the Presets panel and save it. This will allow you to apply the same settings to other portraits quickly.
Following these steps and techniques, you can enhance your portraits in Lightroom while maintaining a realistic look. With practice, you’ll be able to achieve professional-quality edits effortlessly.

